Step 14 on How to Draw Full Body Store
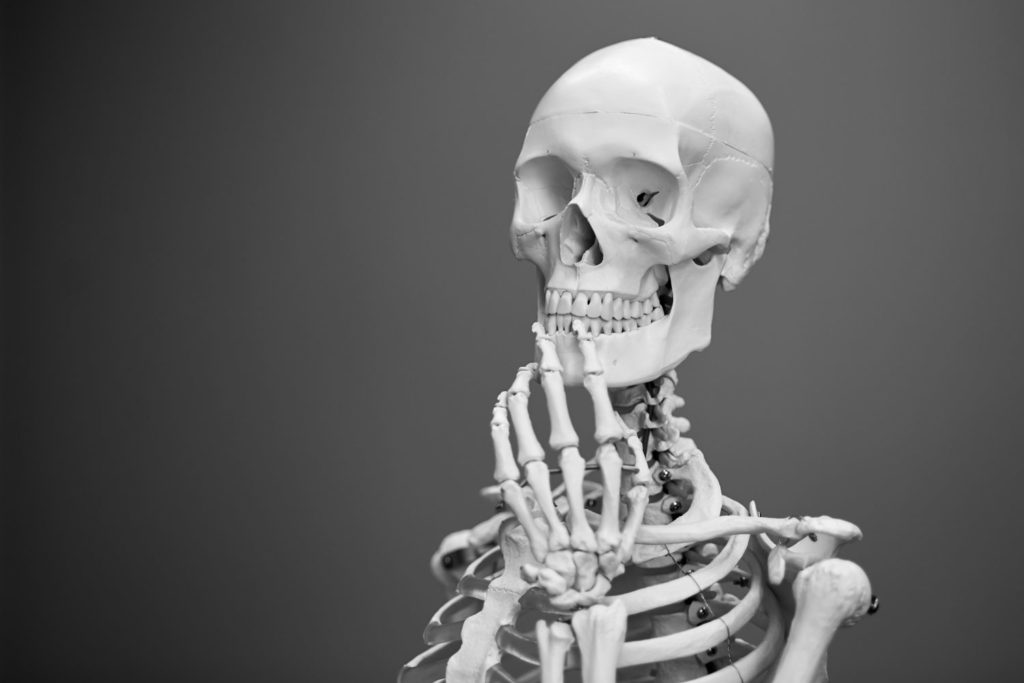
Learning how to draw bodies and anatomy is a fun and exciting prospect for a student of fine art. Information technology means being able to capture the human element in all its forms and movements. And if you are taking your art seriously with a capital 'S' it is essential.
For painting and cartoon, nude figures to clothed, full figures to cropped portraits, you have to know a bit nearly how to draw bodies to get realism in your artwork. But all-time of all, it doesn't accept to exist confusing. That is where creative person Lea Colie Wight, author of Foundations of Classical Oil Painting (which we excerpt hither) comes in. She gives us a rundown of the trunk landmarks nosotros should have note of along with planes we want to focus our eye on anatomically speaking.
Let'due south Start at the Top
The anatomy and planes of the head are a great identify to start considering with an understanding of them comes the power to capture the power and expression found in the human face up.
As you lot written report them, you come to see that the neck is part of the spine and the importance of correctly outlining the shoulder girdle. Also keep in listen that what happens on one side of the body affects the other. When a person bends to the side, that side is compressed and you will see folds. The other side is extended and stretched. The torso works in unison. When a neck is turned, the muscle running from the base of the skull to the clavicle stretches and shows clearly, while the same muscle on the compressed side is hidden.
SKELETAL LANDMARKS OF THE SKULL
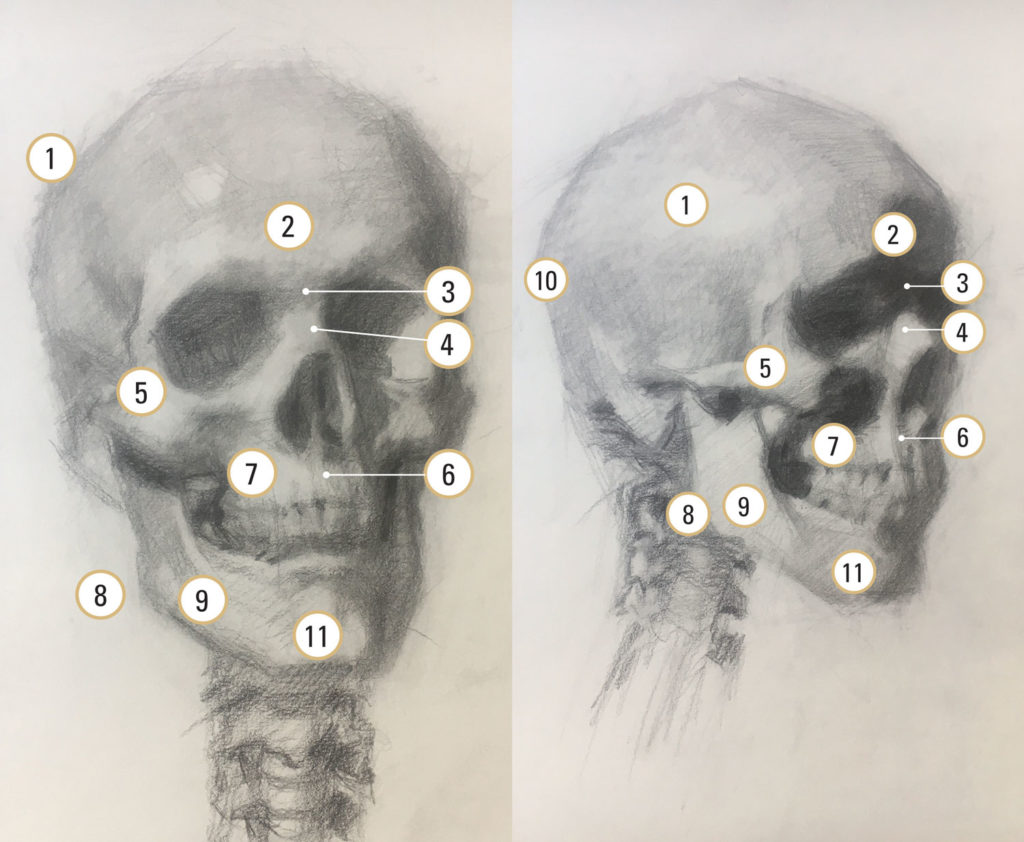
i. Meridian of convexity; ii. Brow ridge; 3. Glabella (keystone); iv. Nasal bone; 5. Zygomatic arch; half dozen. Base of the nose; 7. Maxilla; eight. Angle of the jaw; 9. Mandible; x. Occipital Notch; 11. Mental protuberance or Tubercle
PLANES OF THE HEAD AND NECK
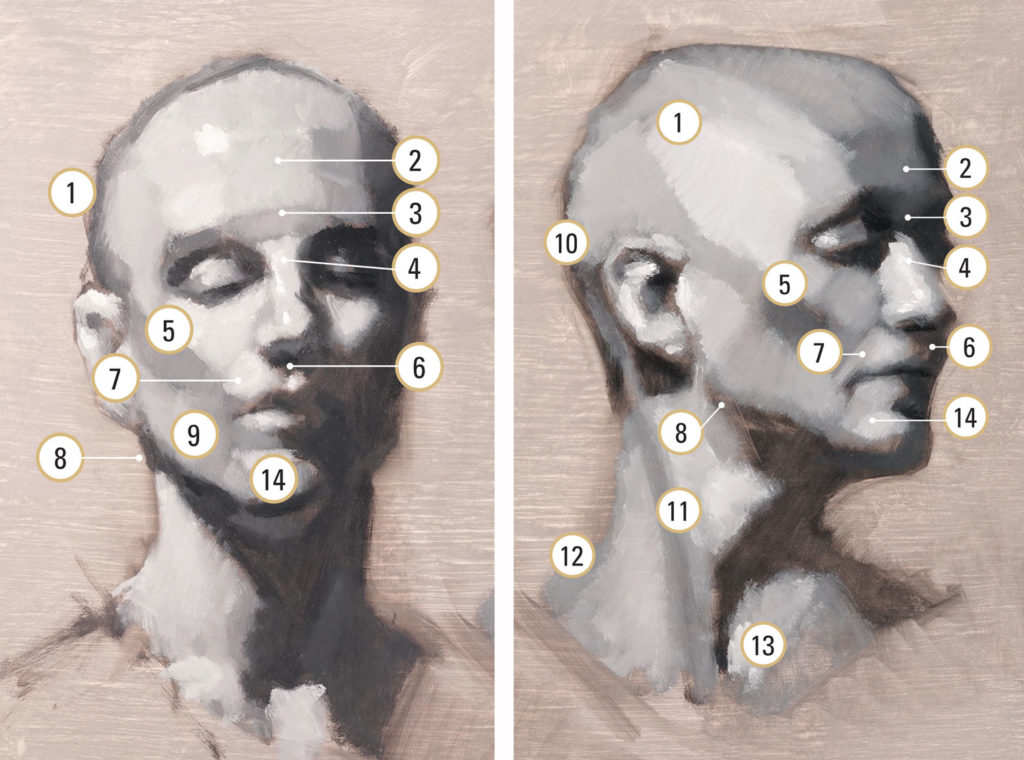
1. Pinnacle of convexity; 2. Forehead ridge; 3. Glabella (keystone); iv. Nasal bone; five. Zygomatic arch; vi. Base of operations of the nose; 7. Maxilla; 8. Angle of the jaw; ix. Mandible; 10. Occipital notch; 11. Sternocleidomastoid muscle; 12. Trapezius muscle; 13. Sternal notch; 14: Mental protuberance or Tubercle
Body Shop
Learning how to draw bodies is all about troubleshooting. No one gets it right the commencement time and when you get it wrong, you know. That means you lot can adjust immediately and keep progressing. And more importantly, the fixes are straightforward. All you have to practice is bring it back to the body. Lea points out that one of your best resources is your ain torso! Feel your basic and joints to see how they work. Motion, stretch and bend to identify your muscles. Then apply this noesis to relate to what y'all're seeing when you are with a model.
SKELETAL LANDMARKS and PLANES OF THE BODY, FRONT VIEW
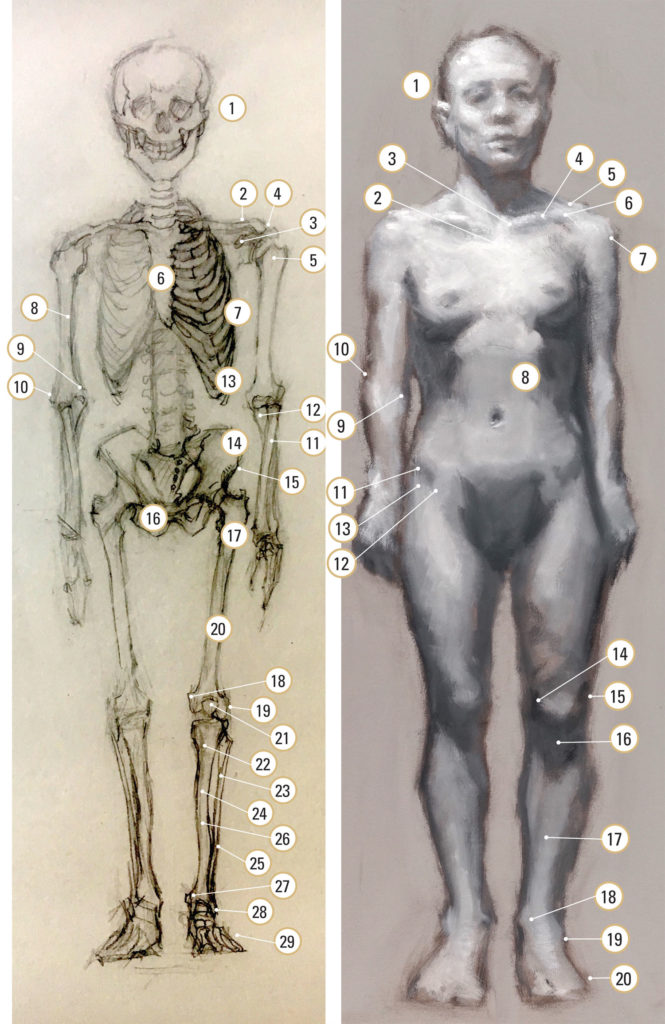
SKELETAL LANDMARKS i. Skull; ii. Clavicle; three. Coracoid process; 4. Acromion procedure; 5. Greater tubercle of the humerus; 6. Sternum; 7. Rib cage; 8. Humerus; 9. Medial epicondyle of the humerus; 10. Lateral epicondyle of the humerus; 11. Radius; 12. Ulna; 13. 10th rib; fourteen. Iliac crest; 15. ASIS; xvi. Pubic os; 17. Great trochanter; 18. Medial epicondyle of the femur; 19. Lateral epicondyle of the femur; 20. Femur; 21. Patella; 22. Medial epicondyle of the tibia; 23. Lateral epicondyle of the tibia; 24. Tibia; 25. Fibula; 26. Curve of the tibia (shin bone); 27. Medial malleolus; 28. Lateral malleolus; 29. Phalanges (toes)
PLANES OF THE Torso 1. Skull; 2. Sternum; 3. Sternal notch; 4. Clavicle; 5. Acromion process (elevation of the scapula); half-dozen. Coracoid process (end of the clavicle); vii. Greater tubercle of the humerus; 8. Rib cage; ix. Medial epicondyle of the humerus; 10. Lateral epicondyle of the humerus; 11. Iliac crest; 12. ASIS; 13. Great trochanter; 14. Medial epicondyle of the femur; 15. Lateral epcondyle of the femur; 16. Patella; 17. Curve of the tibia (shin bone); 18. Medial epicondyle of the tibia (inner talocrural joint bone); 19. Lateral epicondyle of the tibia (outer ankle bone); xx. Phalanges (toes)
SKELETAL LANDMARKS OF THE Body, SIDE VIEW
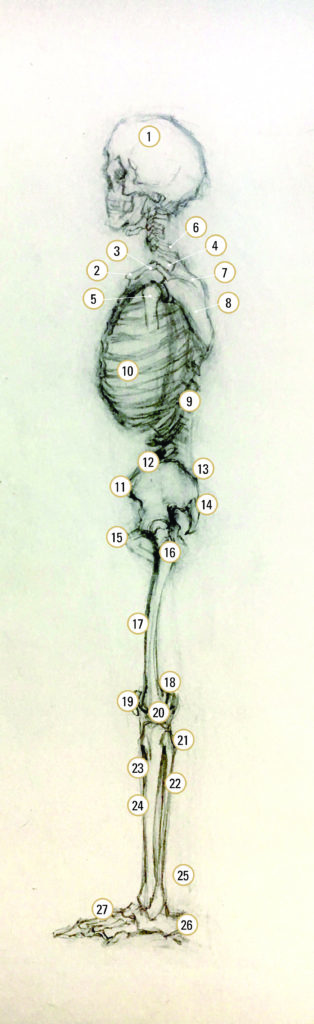
i. Skull; 2. Clavicle; 3. Coracoid process of the clavicle; iv. Acromion process; v. Head of the humerus; vi. 7th cervical vertebrae; 7. Spine of the scapula; 8. Scapula (wing bone); 9. Spine; 10. Rib cage; 11. ASIS; 12. Iliac crest; 13. PSIS; 14. Coccyx (tail bone); fifteen. Pubic bone; 16. Great trochanter; 17. Femur; 18. Lateral epicondyle of the femur; xix. Patella caput of the fibula; 20. Lateral epicondyle of the tibia; 21. Fibula; 22. Fibia; 23. Tibial tuberosity; 24. Curve of the tibia·(shin bone); 25. Lateral malleolus; 26. Calcaneus (heel); 27. Phalanges (toes)
PLANES OF THE Body, SIDE VIEW
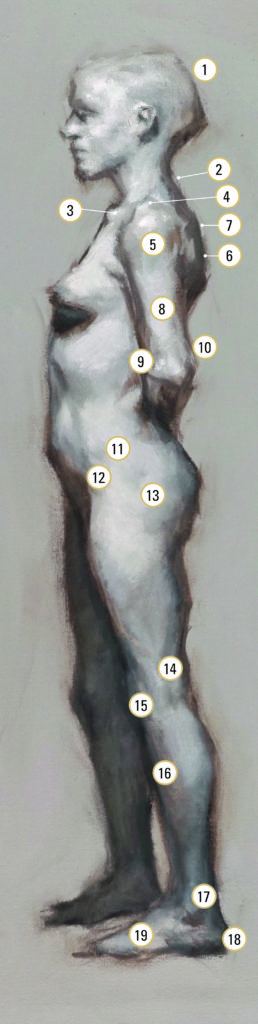
1. Skull; 2. 7th cervical vertebrae; 3. Clavicle; iv. Acromion process; 5. Greater tubercle of the humerus; 6. Spine of the scapula; vii. Medial border of the scapula; 8. Humerus; 9. Medical epicondyle of the humerus; x. Lateral epicondyle of the humerus; 11. Iliac crest; 12. PSIS; 13. Great trochanter; 14. Lateral epicondyle of the femur; 15. Patella; xvi. Tibia; 17. Lateral malleolus; xviii. Calcaneus (heel); 19. Phalanges (toes)
All Those Muscles
If yous're worried about remembering the technical names of each landmark or muscle, don't! The nearly important affair is to recognize them for what they are and how they work—to know a muscle from a fatty area, and to know the deviation between what a flexed muscle looks similar compared to one at rest.
MUSCLES, FRONT VIEW
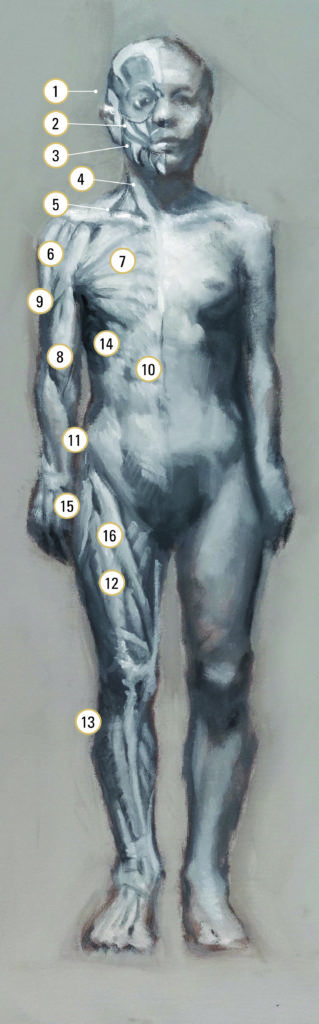
1. Temporalis; ii. Zygomaticus; three. Masseter; 4. Sternocleidomastoid; five. Trapezius; 6. Deltoid; vii. Pectoralis; viii. Biceps; 9. Triceps; ten. Rectus abdominis; 11. Gluteus maximus; 12. Quadriceps; 13. Gastrocnemius; 14. External obliques; xv. Tensor fasciae latae; xvi. Sartorius
MUSCLES, SIDE VIEW
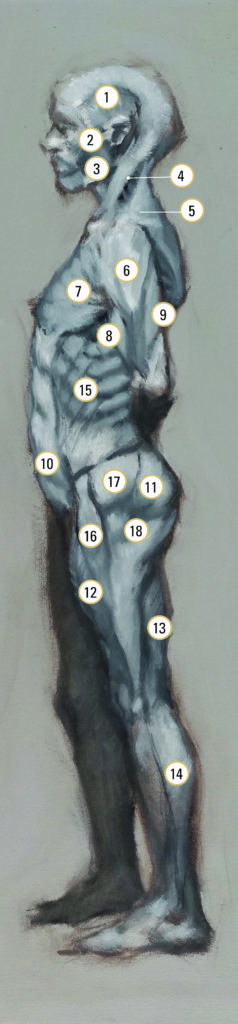
1. Temporalis; 2. Zygomaticus; 3. Masseter; four. Sternocleidomastoid; 5. Trapezius; six. Deltoid; 7. Pectoralis; eight. Biceps; nine. Triceps; 10. Rectus abdominis; 11. Gluteus maximus; 12. Quadriceps; 13. Hamstrings; fourteen. Gastrocnemius; fifteen. External obliques; xvi. Tensor fasciae latae; 17. Sartorius; eighteen. Great trochanter (landmark)
More Landmarks
Equally an creative person, you lot want to be able to understand what you're seeing and to be able to simplify the circuitous form into articulate construction. At that place is a lot of of import data hidden under the skin, and there are universal landmarks on each human being body. These landmarks occur at fixed skeletal points where bone is close to the surface. Keep these in mind and learning how to describe bodies becomes that much more doable!
Identifying Bony Landmarks
Bony landmarks are spots where the bone comes closest to the surface, which let you know the structure underneath the form. Comparing your painting or drawing with these allows you to naught in on accuracy.
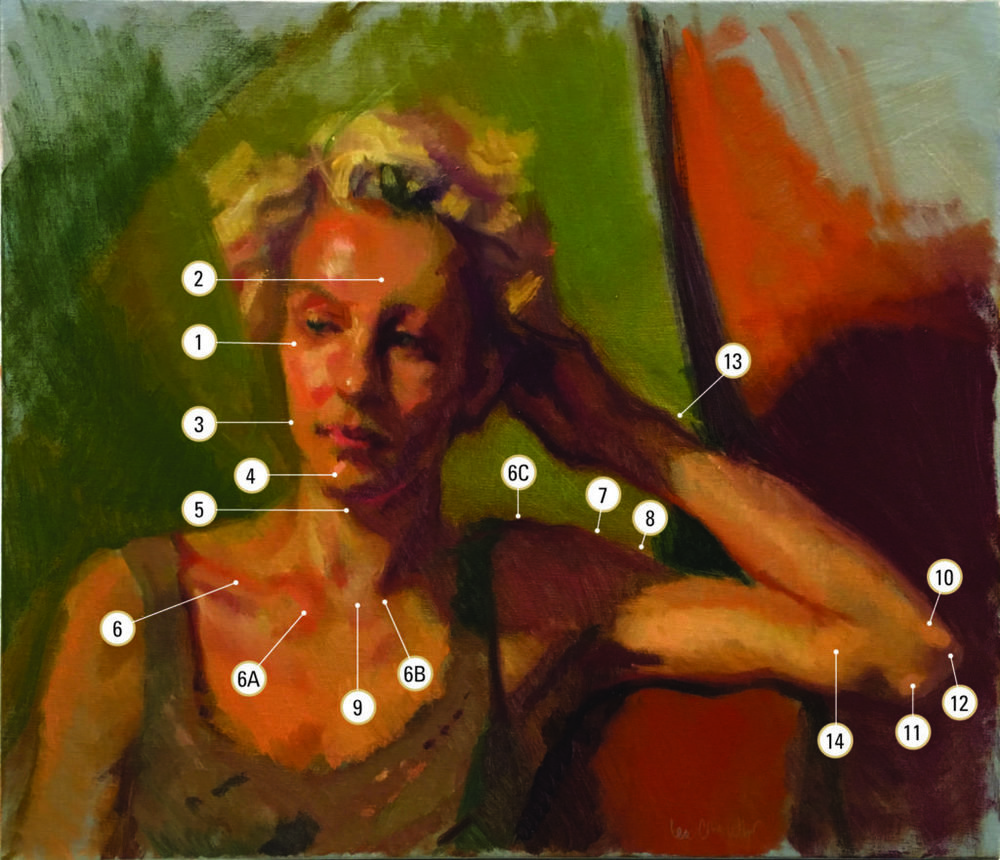
Then you volition beginning to be able to distinguish the parts of the trunk. For example, expect at number xiv. Run into that information technology is not a bony landmark but simply a fat pad that appears when the arm is bent. Forms can exist tricky just utilize these bony and not-so bony landmarks to guide your way.
1: Zygomatic Bone; ii: Glabella; 3: Angle of the ramus or mandible; 4: Tubercle; v: Sternocleidomastoid musculus (muscle running from the clavicle and sternum to the skull); half dozen: Clavicle (collar bone); 6A: Clavicle (sternal head); 6B: Clavicle (sternal caput hidden by shoulder position); 6C: Clavicle (acromial terminate); Scapula (acromion); Humerus (greater tubercle, hidden in this position); 9: Pit of the cervix (sternal notch); 10: Ulna (olecranon); eleven: Humerus (medial epicondyle); 12: Humerus (lateral epicondyle); thirteen: Radius (styloid process); 14: Compressed fat mass (not a bony landmark!). Note that 6B, 7 and viii make up the acromion process.
Next Steps
If this has but whetted your appetite for how to draw bodies, don't freak out but we've only scratched the surface here. In that location'due south and then much more to learn! Getting Lea Coli Wight's book, Foundations of Classical Oil Painting , is a adept next step every bit it will guide yous along every part of your development in one of the most historied art mediums e'er — oil painting. Lea besides recommends looking into an écorché sculpture workshop, where you'll be able to put your love of human anatomy into play even further. Enjoy!
Source: https://www.artistsnetwork.com/art-subjects/portrait-figure/how-to-draw-bodies-lea-colie-wight/
0 Response to "Step 14 on How to Draw Full Body Store"
Post a Comment